
12 Action Steps
STEP 11: Getting to the “Root” of the Problem
A major challenge in process improvement is getting to the heart of the problem
or opportunity.
There is danger in starting with a solution without thoroughly
exploring the problem. Multiple factors may have contributed, and/or the
problem may be a symptom of a larger issue. What seems like a simple issue may
involve a number of departments.
Root Cause Analysis
(RCA) is a term used to describe a systematic process for identifying
contributing causal factors that underlie variations in performance. This
structured method of analysis is designed to get to the underlying cause of a
problem –which then leads to identification of effective interventions that can
be implemented in order to make improvements.
RCA helps teams understand that the most immediate or seemingly obvious reason
for the problem or an event may not be the real reason that an event occurred.
The RCA process leads to digging deeper and deeper—looking for the reasons
behind the reasons. This process will generally lead to the identification of
more than one root cause. The root cause(s) and any contributing factors can
then be sorted into categories to facilitate the identification of various
actions that can be taken to make improvements.
RCA focuses primarily on systems and processes, not individual performance.
The RCA process takes practice, but can be a valuable tool for
performance improvement. In order to get familiar with RCA you and your team
may consider:
- Studying case examples of RCA.
- Applying RCA to an adverse event and discussing this technique with the team.
- Building RCA examples into training opportunities.
https://www.cms.gov/medicare/provider-enrollment-and-certification/qapi/downloads/qapiataglance.pdf
Brainstorming, Affinity Grouping, and Multi-Voting Tool
Directions: Brainstorming, Affinity Grouping, and Multi-voting are approaches for generating, categorizing, and choosing among ideas from a group of people. Using these techniques encourages every person within the group to contribute, instead of just one or two. They spark creativity in group members as they listen to the ideas of others and generate a substantial list of ideas, rather than just the few things that first come to mind. Finally, the techniques allow a group of people to choose among ideas or options thoughtfully.
The following descriptions of Brainstorming, Affinity Grouping and Multi-voting are intended to be used by QAPI teams when ideas are needed and decisions need to be made.
Brainstorming
The following descriptions of Brainstorming, Affinity Grouping and Multi-voting are intended to be used by QAPI teams when ideas are needed and decisions need to be made.
- The session leader should clearly state the purpose of the brainstorming session and lay out the ground rules, as they are discussed below.
- Participants call out one idea at a time, either going around the group of people in turn, which structures participation from everyone, or at random, which may favor greater creativity. Another option is to begin the brainstorming session by going in turn and after a few rounds open it up to all to call out ideas as they occur.
- Refrain from discussing, complimenting, criticizing, or evaluating ideas as they are presented. Consider every idea to be a good one. Aim for many ideas in a short amount of time. The quantity of ideas is what matters; evaluation of the ideas and their relative merit comes later. This tool is designed to get as many ideas generated in a short period of time as possible. Discussing ideas may lead to premature judgment and slow down the process.
- Record all ideas on a flip chart, or on self-adhesive notes so that all group members can see them.
- Build on and expand the ideas of other group members. Encourage creative thinking.
- When generating ideas in turn, let participants pass if an idea does not come to mind quickly or if the participant does not have something to share at that time.
- Keep going when the ideas slowdown, reach for less obvious ideas to create as long a list as possible. Do not cut off the flow of ideas.
- After all ideas are listed, clarify each one and eliminate exact duplicates.
-
Resist the temptation to “lump” or group ideas. Combining similar ideas will come later (see Affinity Grouping).
Examples of topics when brainstorming might be helpful in nursing homes:
- Identifying was to involve direct care staff in QAPI
- Identifying ways to address the identified root cause of a problem that has occurred or is occurring
- Identifying ways to be more welcoming to new staff or to new residents
- Identifying ways to promote more a more restful night’s sleep for residents
- Identifying ways that residents and families could be involved in QAPI
Affinity Grouping
Affinity Grouping is a brainstorming method in which participants organize their ideas and identify common themes.
- Write ideas on individual cards or adhesive notes (see directions for Brainstorming).
- Randomly place cards on a table or place notes on flip chart paper taped to the wall.
- Without talking, each person looks for two cards or notes that seem to be related and places these together, off to one side. Others can add additional cards or notes to a group as it forms or reform existing groups. Set aside any cards or notes that become controversial.
- Continue until all items have been grouped (or set aside). There should be fewer than 10 groupings.
- Now discuss the groupings as a team. Generate short, descriptive sentences that describe each group and use these as title cards or notes. Avoid one- or two-word titles.
- Items can be moved from one group to another if a consensus emerges during the discussion.
- Consider additional brainstorming to capture new ideas using the group titles to stimulate thinking.
Multi-voting
Multi-voting is a structured series of votes by a team, in order to narrow down a broad set of options to a few.
- Generate a list of items (see directions for Brainstorming).
- Combine similar items into groups that everyone agrees on (see directions for Affinity Grouping).
- Number each item.
- Each person chooses one-third of the items. This voting can be done in a number of ways: a) each person submits their votes privately to the person will tally the votes, b) each person shares their votes publicly with the group and with the person who will tally the votes, or c) each person marks their choices from the list of items that are displayed on wall charts with an “X” or colored dot – this displays the results instantly.
- Tally votes.
-
Eliminate items with few votes. The table below will help you determine how to eliminate items:
Group Size
(Number of people)Eliminate items with less than "x" votes 4 to 5 2 6 to 10 3 10 to 15 4 15 or more 5
If a decision is clear, stop here. Otherwise, repeat the multi-voting process with remaining items, as necessary.
How to Use the Fishbone Tool for Root Cause Analysis
Overview: Root cause analysis is a structured team process that assists in identifying underlying factors or causes of an adverse event or near-miss. Understanding the contributing factors or causes of a system failure can help develop actions that sustain the correction.
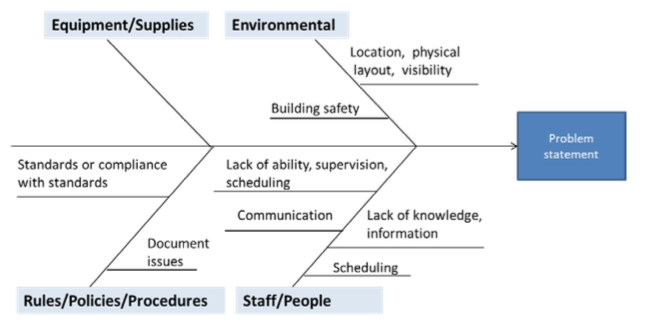
A cause and effect diagram, often called a “fishbone” diagram, can help in brainstorming to identify possible causes of a problem and in sorting ideas into useful categories. A fishbone diagram is a visual way to look at cause and effect. It is a more structured approach than some other tools available for brainstorming causes of a problem (e.g., the Five Whys tool). The problem or effect is displayed at the head or mouth of the fish. Possible contributing causes are listed on the smaller “bones” under various cause categories. A fishbone diagram can be helpful in identifying possible causes for a problem that might not otherwise be considered by directing the team to look at the categories and think of alternative causes. Include team members who have personal knowledge of the processes and systems involved in the problem or event to be investigated.
Directions:
The team using the fishbone diagram tool should carry out the steps listed below.
- Agree on the problem statement (also referred to as the effect). This is written at the mouth of the “fish.” Be as clear and specific as you can about the problem. Beware of defining the problem in terms of a solution (e.g., we need more of something).
- Agree on the major categories of causes of the problem (written as branches from the main arrow). Major categories often include: equipment or supply factors, environmental factors, rules/policy/procedure factors, and people/staff factors.
- Brainstorm all the possible causes of the problem. Ask “Why does this happen?” As each idea is given, the facilitator writes the causal factor as a branch from the appropriate category (places it on the fishbone diagram). Causes can be written in several places if they relate to several categories.
- Again asks “Why does this happen?” about each cause. Write sub-causes branching off the cause branches.
- Continues to ask “Why?” and generate deeper levels of causes and continue organizing them under related causes or categories. This will help you to identify and then address root causes to prevent future problems.
Tips:
- Use the fishbone diagram tool to keep the team focused on the causes of the problem, rather than the symptoms.
- Consider drawing your fish on a flip chart or large dry erase board.
- Make sure to leave enough space between the major categories on the diagram so that you can add minor detailed causes later.
- When you are brainstorming causes, consider having team members write each cause on sticky notes, going around the group asking each person for one cause. Continue going through the rounds, getting more causes, until all ideas are exhausted.
- Encourage each person to participate in the brainstorming activity and to voice their own opinions.
- Note that the “five-whys” technique is often used in conjunction with the fishbone diagram – keep asking why until you get to the root cause.
- To help identify the root causes from all the ideas generated, consider a multi-voting technique such as having each team member identify the top three root causes. Ask each team member to place three tally marks or colored sticky dots on the fishbone next to what they believe are the root causes that could potentially be addressed.
Examples:
Here is an example of the start of a fishbone diagram that shows sample categories to consider, along with some sample causes.
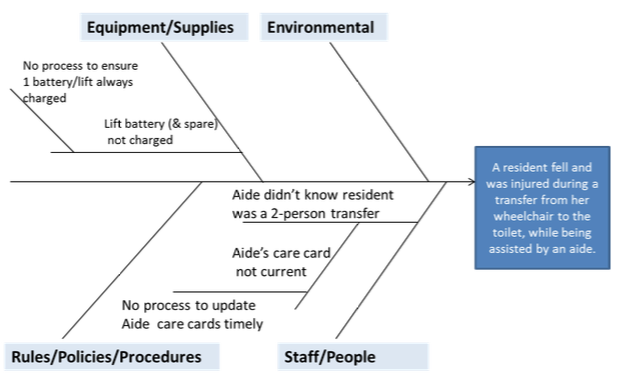
Here is an example of a completed fishbone diagram, showing information entered for each of the four categories agreed upon by this team. Note, as each category is explored, teams may not always identify problems in each of the categories.
Facts gathered during preliminary investigation:
- Time of fall: change of shift from days to evenings
- Location of fall: resident’s bathroom
- Witnesses: resident and aide
- Background: the plan of care stipulated that the resident was to be transferred with two staff members, or with one staff member using a sit-to-stand lift.
- Information from interviews: the resident was anxious and needing to use the bathroom urgently. The aide was helping the resident transfer from her wheelchair to the toilet, without using a lift, and the resident fell, sustaining an injury. The aide stated she did not use the lift because the battery was being recharged, and there was no extra battery available. The aide stated she understood that the resident could be transferred with assist of one.
With this information, the team proceeded to use the fishbone diagram to better understand the causes of the event.
The value of using the fishbone diagram is to dig deeper, to go beyond the initial incident report, to better understand what in the organization’s systems and processes are causing the problem, so they can be addressed.
In this example, the root causes of the fall are:
- There is no process in place to ensure that every lift in the building always has a working battery. (One battery for the lift on this unit is no longer working, and the other battery was being recharged.)
- There is no process in place to ensure timely communication of new care information to the aides. (New transfer information had not yet been conveyed to the aide. The aide’s “care card” still indicated transfer with assist of one for this resident.)
The root causes of the event are the underlying process and system problems that allowed the contributing factors to culminate in a harmful event. As this example illustrates, there can be more than one root cause. Once you have identified root causes and contributing factors, you will then need to address each root cause and contributing factor as appropriate. For additional guidance on following up on your fishbone diagram findings, see the Guidance for Performing RCA with Performance Improvement Projects tool.
Five Whys Tool for Root Cause Analysis
Overview: Root cause analysis is a structured team process that assists in identifying underlying factors or causes of an event, such as an adverse event or near –miss. Understanding the contributing factors or causes of a system failure can help develop actions that sustain corrections.
The Five Whys is a simple problem-solving technique that helps to get to the root of a problem quickly. The Five Whys strategy involves looking at any problem and drilling down by asking: "Why?" or "What caused this problem?" While you want clear and concise answers, you want to avoid answers that are too simple and overlook important details. Typically, the answer to the first "why" should prompt another "why" and the answer to the second "why" will prompt another and so on; hence the name Five Whys. This technique can help you to quickly determine the root cause of a problem. It's simple, and easy to learn and apply.
Directions: The team conducting this root cause analysis does the following:
- Develops the problem statement. (See Step 1 of Guidance for RCA for additional information on problem statements.) Be clear and specific.
- The team facilitator asks why the problem happened and records the team response. To determine if the response is the root cause of the problem, the facilitator asks the team to consider “If the most recent response were corrected, is it likely the problem would recur?” If the answer is yes, it is likely this is a contributing factor, not a root cause.
- If the answer provided is a contributing factor to the problem, the team keeps asking "Why?" until there is agreement from the team that the root cause has been identified.
- It often takes three to five whys, but it can take more than five! So keep going until the team agrees the root cause has been identified.
Tips:
Affinity Grouping is a brainstorming method in which participants organize their ideas and identify common themes.
- Include people with personal knowledge of the processes and systems involved in the problem being discussed.
- Note that the Five Whys technique may not always help you to identify the root cause. Another technique you might consider is the fishbone diagram. The fishbone diagram forces you to think broadly across various categories that could be causing or contributing to the problem (See How to Use the Fishbone Tool for Root Cause Analysis tool).
| Why? |
|
| Why? |
|
| Why? |
|
| Why? |
|
| Root Cause(s) |
1. 2. 3. To validate root causes, ask the following: If you removed this root cause, would this event or problem have been prevented? |
Example:
Here is an everyday example of using the Five Whys to determine a root cause: Problem statement – your car gets a flat tire on your way to work.
-
Why did you get a flat tire?
- You ran over nails in your garage
-
Why were there nails on the garage floor?
- The box of nails on the shelf was wet; the box fell apart and nails fell from the box onto the floor.*
-
Why was the box of nails wet?
- There was a leak in the roof and it rained hard last night. (Root cause=leak in the roof)
*IF YOU STOPPED HERE AND "SOLVED" THE PROBLEM BY SWEEPING UP THE NAILS, YOU WOULD HAVE MISSED THE ROOT CAUSE OF THE PROBLEM.
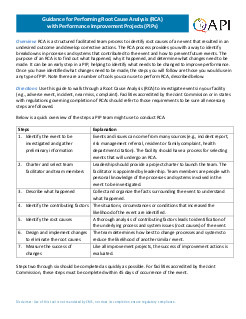
Guidance for Performing Root Cause Analysis (RCA) with Performance Improvement Projects (PIPs)
Overview: RCA is a structured facilitated team process to identify root causes of an event that resulted in an undesired outcome and develop corrective actions. The RCA process provides you with a way to identify breakdowns in processes and systems that contributed to the event and how to prevent future events. The purpose of an RCA is to find out what happened, why it happened, and determine what changes need to be made. It can be an early step in a PIP, helping to identify what needs to be changed to improve performance. Once you have identified what changes need to be made, the steps you will follow are those you would use in any type of PIP. Note there are a number of tools you can use to perform RCA, described below.
Directions: Use this guide to walk through a Root Cause Analysis (RCA) to investigate events in your facility (e.g., adverse event, incident, near miss, complaint). Facilities accredited by the Joint Commission or in states with regulations governing completion of RCAs should refer to those requirements to be sure all necessary steps are followed.
Below is a quick overview of the steps a PIP team might use to conduct RCA.
| Steps | Explanation | ||
|---|---|---|---|
|
Events and issues can come from many sources (e.g., incident report, risk management referral, resident or family complaint, health department citation). The facility should have a process for selecting events that will undergo an RCA. | ||
|
Leadership should provide a project charter to launch the team. The facilitator is appointed by leadership. Team members are people with personal knowledge of the processes and systems involved in the event to be investigated. | ||
|
Collect and organize the facts surrounding the event to understand what happened. | ||
|
Events and issues can come from many sources (e.g., incident report, risk management referral, resident or family complaint, health department citation). The facility should have a process for selecting events that will undergo an RCA. | ||
|
A thorough analysis of contributing factors leads to identification of the underlying process and system issues (root causes) of the event. | ||
|
The team determines how best to change processes and systems to reduce the likelihood of another similar event. | ||
|
Like all improvement projects, the success of improvement actions is evaluated. |
Steps two through six should be completed as quickly as possible. For facilities accredited by the Joint Commission, these steps must be completed within 45 days of occurrence of the event.
Events that may be investigated using the RCA process can be identified from many sources (e.g., incident report, risk management referral, staff, resident, or family feedback, health department citation). High priority should be given to events that resulted in significant resident harm or death and other events the facility is required by regulation to investigate. Also consider doing an RCA for “near miss” or “close call” events that could have resulted in harm to the resident, but did not, either by chance or timely intervention. The latter types of events represent high risk situations that could, in the future, cause a resident to be harmed.
Once an event is selected for a Performance Improvement Project (PIP) involving RCA, someone involved in the facility QAPI program can begin gathering preliminary information, including the incident report and any documentation from the preliminary investigation, for later discussion by the team. This may include interviews with those involved including the resident or family members, collection of pertinent documentation or photographs, review of relevant policies and procedures, quarantine of defective equipment, etc. This preliminary information is also useful for deciding which individuals should be invited to serve as members of the team as described in Step 2.
✓ Helpful Tips:
- Involve facility leaders in the prioritization and decision to proceed with an RCA. There will be greater cooperation in completing RCAs when the process is viewed as leadership-driven.
- Be sure to start with a problem and not the solution. It is tempting to assume we know what will fix the problem before we’ve thoroughly examined it. Assumptions are often wrong and may hinder complete analysis of the underlying causes.
- Don’t define the problem as a need for something. The problem statement should objectivelystate what went wrong, not why, or how. An example of an effective problem statement is, "Resident X continued to receive a medication one week after the order was given for discontinuation." A good problem statement will facilitate a more thorough examination of the problem.
- If the event represents a liability concern or questionable practices by an employee, the leadership team can initiate a risk management review or an employee performance review to start simultaneous with, but separate, from the RCA process. The RCA process should focus on systems rather than individual performance.
Next, leadership designates a facilitator for the PIP team, and works with the facilitator to create a charter that will help guide the team in managing the scope of the project and making changes that are ultimately linked to the root causes identified in the RCA process. Together, leadership and the facilitator select staff to participate on the PIP team. As managers and supervisors gain experience in doing RCAs, more people in the facility can be trained to serve as team facilitators. The facilitator is responsible for assembling and managing the team, guiding the analysis, documenting findings and reporting to the appropriate persons.
The number of team members depends on the scope of the investigation. Individuals selected to serve as team members must be familiar with the processes and systems associated with the event. People who have personal knowledge of what actually happened should be included as team members or given an opportunity to contribute to the investigation through interviews.
✓ Helpful Tips:
- Team members should be selected for their ability to discuss and review what happenedduring the event in an objective and unbiased manner. In some situations, staff members personally involved in the event are the best people to serve as team members. In other situations, staff members not personally involved in the event are the best people to serve as team members with the people personally involved asked to share their experience during interviews. This may be appropriate if the people directly involved in the event are dealing with emotions and are not able to be objective. However, if this is the case, it is a good idea to provide those staff persons directly involved with counseling and support so that they are able to participate in the RCA process. Participating in the RCA process and hearing other's objective viewpoints can help them to deal with the situation in a positive manner.
- Keep the number of management or supervisory level individuals on the team to a minimum. Staff members may be inhibited from speaking up or being completely candid during discussions about what happened if their direct supervisor is in the room. If this is not possible, the facilitator should explain the need for members to be free to discuss the process honestly, as it is actually carried out in the facility.
- Make it clear to everyone involved that the RCA process is confidential. This reassurance helps people feel safer discussing the process and system breakdowns that may have caused an inadvertent mistake.
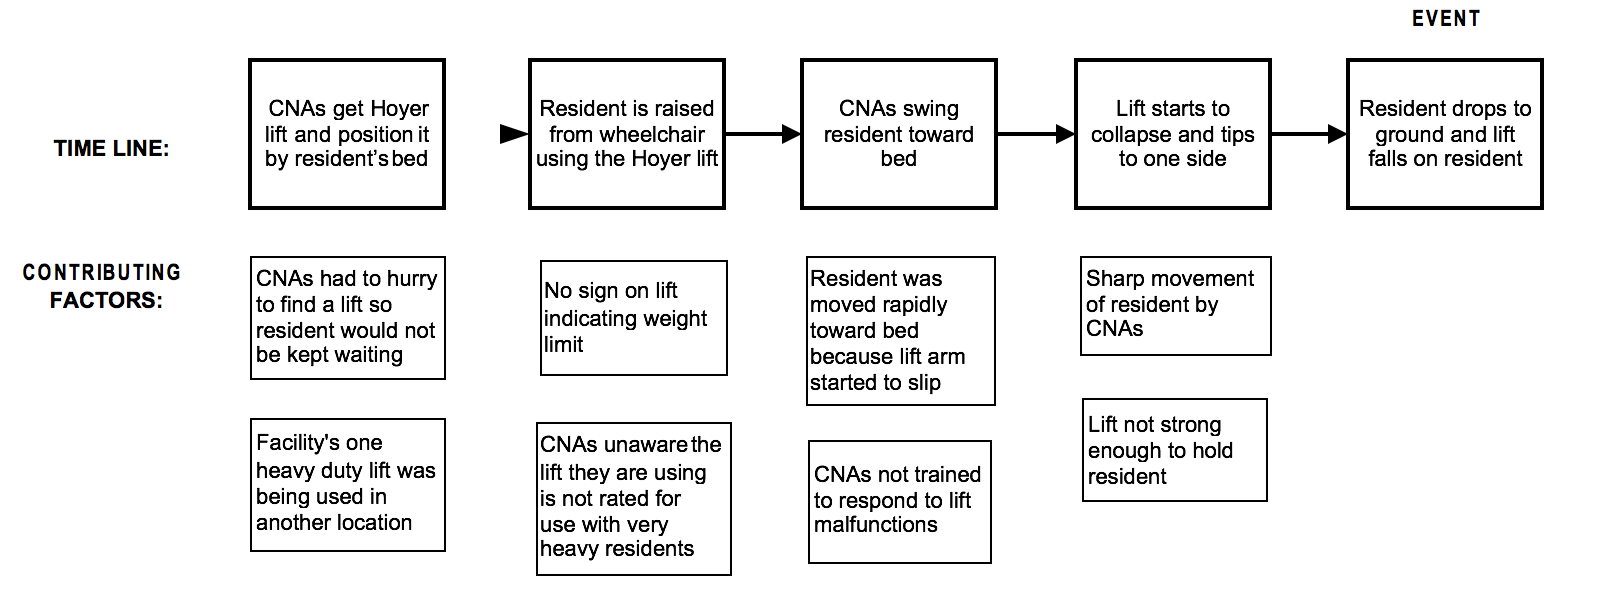
At the first meeting of the team, a time line of the event under review is created. The preliminary information gathered in step 1 is shared with the team and other details about the event are elicited from team members. If the people personally involved in the event are not part of the team, their comments about what happened are shared with team members. All of this information is used to create a time line of the event – the sequence of steps leading up to the harmful event.
Below is a time line for a situation involving a resident that suffered a serious injury during his transfer from a wheelchair back to his bed. This tall and larger man (300-pound) was placed in a Hoyer lift and elevated into the air above his wheelchair. As the CNAs turned the lift toward the bed it began to sink because the lift arm couldn't handle the resident’s weight. In an attempt to complete the transfer before the patient was below the level of the bed, the CNAs swung the lift quickly toward the bed. The lift tilted dangerously to the side and the legs started to move together, narrowing the base of support. The resident dropped to the ground and the lift fell on top of him.

Use a flipchart or sticky notes to draw a preliminary time line. Before proceeding to Step 4 of the RCA, be sure that everyone agrees that the time line represents what actually happened. Now is the time for the team to add missing steps or clarify "factual" inconsistencies about the event.
✓ Helpful Tips:
- The time line of the event should describe just the facts – not what caused the facts to happen. For instance, the CNAs may have mistakenly used a Hoyer lift that was not strong enough to move a tall resident weighing 300 lbs. This factor may have contributed to the event, but it is not documented in the time line. Only the facts of what happened should be included in the time line, the causal factors are added in a later step.
-
Once the preliminary time line has been created, the facilitator finalizes the time line by asking the team:
- Does the time line adequately tell the "story" of the incident? If not, the scope of the timeline may need to be extended further back in time or expanded to include what happened after the event.
- Does each step in the time line derive directly from the step it precedes? If each step is not derived logically from the one preceding it, it usually indicates that one or more steps in the sequence have been left out. Add missing steps to the time line.
- Is each step in the timeline pertinent to the incident under investigation? The answer may be "yes", "no," or "not sure." Include only the "yes" and "not sure" steps in the final event line.
- In rare situations the team cannot identify a sequence of steps leading up to the harmful event. For instance, when a resident develops an intravenous (IV) catheter−related infection it may not be possible to pinpoint the exact steps preceding the infection event. The infection appears to have occurred despite staff members apparently doing all the right things (e.g., following good hygiene when inserting catheters and caring for catheterized residents). In these situations, a time line is not created – however don’t jump to this conclusion too quickly. It is harder to find all the root causes of an undesirable event if the team does not have a time line to guide their decisions.
- Resist the temptation to skip right to step 5 of the RCA process, which is "Identify the root causes." Team members may insist the root causes of the event are already understood and it is not necessary to go through steps 2 through 4. Jumping to conclusions about root causes increases the likelihood the team will end up with "quick-fix" solutions that do not address the underlying systems gaps, or contributing factors, and fail to prevent similar events in the future.
Here is where the knowledge gained during step 3 is used by the team to dig deeper into what happened to discover why it happened.
Step 4 involves the team looking at each step of time line and asking, “What was going on at this point in time that increased the likelihood the event would occur?” These are the contributing factors – situations, circumstances or conditions that collectively increased the likelihood of an incident. By itself a contributing factor may not have caused the incident, but when they occur at the same time, the probability an incident will occur increases.
As mentioned in Step 2, it is important to get the perspective of people personally involved in the event when identifying the contributing factors at each step. These may be the only individuals aware of the actual circumstances affecting what happened. For instance, the CNA who chose the wrong type of lift might have felt pressured by her supervisor to find a lift as quickly as possible so the resident would not be kept waiting. Team members not personally involved in the event might be unaware this contributing factor existed.
Below are examples of contributing factors that might be identified for each step of the time line for the event involving a resident injury during transfer from wheelchair to bed.
✓ Helpful Tips:
- Consider what was happening at each step in the time line to ensure the team does not overlook some important factors. Whenever possible, use a time line as the basis for identifying contributing factors.
- Brainstorming can be an effective tool to identify contributing factors by asking, "What might have happened that would increase the likelihood the event would occur?" Consider what recommended practices might not have been followed, e.g. sterile dressing changes not done for IV-catheter sites. Consider what procedure "work-arounds" might have occurred. Consider how staffing at the time of the event might have impacted the eventual outcome.
- When identifying contributing factors be careful to avoid "hindsight bias." Knowing the eventual outcome of a time line can influence how team members view activities leading up to the event. Remember to consider only those factors that were actually present and known to those involved at the time – not what was only realized after-the-fact.
All incidents have a direct cause. This is the occurrence or condition that directly produced the incident. In the resident incident described in Step 3, the tilting and collapsing Hoyer lift is the direct cause of the accident. However, the direct cause is not the root cause.
Root causes are underlying faulty process or system issues that lead to the harmful event. Often there are several root causes for an event.
Contributing factors are not root causes. The team needs to examine the contributing factors to find the root causes. This can be done by digging deeper – asking repeated “why” questions of the contributing factors.
This is called the “five why’s” technique, which is illustrated below.
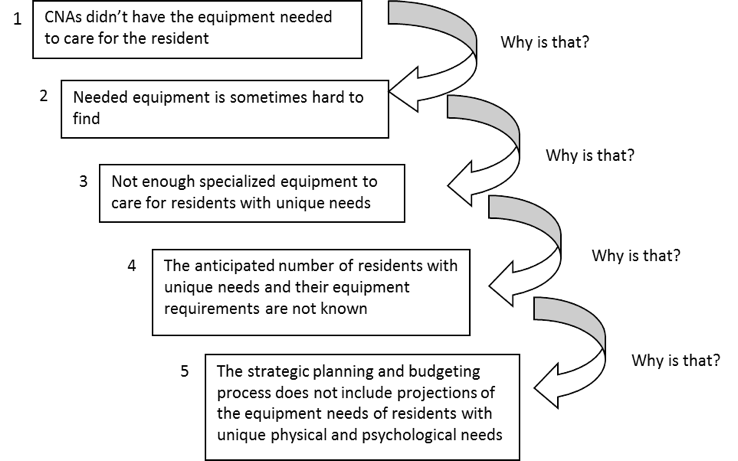
This questioning process is continued until all the root causes are found. It is common to find the same root cause for two or more contributing factors.
✓ Helpful Tips:
-
The team must determine if they’ve truly identified a root cause, versus a contributing factor which requires the team to do more digging. Ask the questions below about each potential root cause identified by the team. If the answers are NO, then the team has identified root causes and they can stop the questioning process. If the answer to any question is YES, then the team may not have identified true root causes and needs to ask more “why” questions to get to the root causes. Keep asking these until you get to root causes.
- Would the event have occurred if this cause had not been present?
- Will the problem recur if this cause is corrected or eliminated?
- The team should not make judgments about whether an individual did the right thing. This judgment is to be made by the manager responsible for evaluating the employee’s performance. The facilitator may need to remind team members that the RCA process is not where these judgments are to be made.
- The team facilitator should watch out for discussion “manipulation” during this stage. Some team members may try to divert attention from root causes originating in their department or direct the discussion away from root causes that will require additional resources or necessitate significant changes to how work is now being done. A successful RCA process requires frank and open discussions of the causes of the event.
- A fishbone diagram can also be used to determine root causes; see the CMS QAPI website for more information on this tool.
In this step the team evaluates each root cause to determine how best to reduce or prevent it from triggering another harmful event. The key is to choose actions that address each root cause. These actions will generally require creating a new process or making a change to a current process. The steps to accomplish this are the same as those used in any type of PIP. Note that at this point, you may want to reevaluate the composition of your team to make sure you have included people who are part of the process being changed. It is a good idea throughout a project to make sure you have the right people on the team and to adjust membership as needed.
At least one corrective action should be developed to reduce or eliminate each root cause. Some action plans will be short-term solutions to fix a contributing factor, e.g. purchase an additional Hoyer lift rated for use by residents weighing over 250 lbs. But short-term solutions rarely fix root causes. For instance, in the example event the team also needs to recommend that a formal evaluation of future specialized equipment needs for residents be regularly incorporated into the facility strategic planning and budgeting process.
When developing corrective actions consider questions such as:
- What safeguards are needed to prevent this root cause from happening again?
- What contributing factors might trigger this root cause to reoccur? How can we prevent this from happening?
- How could we change the way we do things to make sure that this root cause never happens?
- If an event like this happened again, how could we stop the accident trajectory (quickly catch and correct the problem) before a resident was harmed?
- If a resident were harmed by this root cause, how could we minimize the effect of the failure on the resident?
Aim for corrective actions with a stronger or intermediate rating, based on the categories of actions below. Corrective actions that change the system and do not allow the errors to occur are the strongest.
Stronger Actions
- Change physical surroundings
- Usability testing of devices before purchasing
- Engineering controls into system (forcing functions which force the user to complete an action)
- Simplify process and remove unnecessary steps
- Standardize equipment or process
- Tangible involvement and action by leadership in support of resident safety; i.e., leaders are seen and heard making or supporting the change
Intermediate Actions
- Increase staffing/decrease in workload
- Software enhancements/modifications
- Eliminate/reduce distractions
- Checklist/cognitive aid
- "Read back" to assure clear communication
- Enhanced documentation/communication
Weaker Actions
- Double checks
- Warnings and labels
- New procedure/memorandum/policy
- Training
- Additional study/analysis
For example, suppose staff members cannot locate the equipment to use when lifting larger residents, because the specialty equipment is not kept in the same location. The strongest action to prevent another accident would be to keep all equipment designed for special needs residents in just one storage area (change physical surroundings). Staff members will no longer need to differentiate “usual” equipment from “specialized” equipment. If this action is not feasible, consider placing a sign on the lift equipment – "DO NOT USE FOR RESIDENTS OVER 250 LBS." This is an example of a warning or label (sometimes called a visual cue). It is a weak action because staff members might overlook the warning, but if no other stronger action is available, a weak action is better than none at all.
When designing corrective actions, clearly state what is to be done, by whom, and when. Satisfactory implementation of the corrective actions will be monitored so it is important to have clearly defined plans.
✓ Helpful Tips:
- The team leader should encourage team members to come up with as many intermediate and strong actions as possible. It is helpful to involve supervisory and management staff in the action planning discussions. Designing intermediate and strong actions often requires an understanding of various resident care systems and the facility’s resource allocation priorities. Staff members on the team may not possess this knowledge.
- Because the feasibility and costs associated with corrective actions must also be considered it is helpful to include facility management in the corrective action discussions, if they are not already members of the team.
- If a particular action cannot be accomplished due to current constraints (e.g. lack of resources), the team should look for other ways of changing the process to prevent a similar event from occurring in the future. Doing nothing should not be an option.
Concurrent with implementation of action plans, mechanisms are established to gather data that will be used to measure the success of the corrective action. The RCA should reduce the risk of future harmful events by minimizing or eliminating the root causes. What you measure should provide answers to three questions:
- Did the recommended corrective actions actually get done? (e.g., Did the warning signs get put on the Hoyer lifts? Did a formal equipment evaluation step get added to the annual budgeting process?)
- Are people complying with the recommended changes (e.g., How often is the wrong type of Hoyer lift used for residents weighing over a predetermined weight? Is staff provided an opportunity to participate in an equipment needs assessment during the budgeting process?)
- Have the changes made a difference? (Has another resident been harmed by equipment unsuited for their physical condition?)
Evaluating the success of the PIP usually occurs after the team has been disbanded, and will become the responsibility of the person designated to monitor the corrective action/s. The QAA committee is responsible for overseeing all QAPI activities, which includes reviewing data on the effectiveness of all improvement projects. Ideally, all of the following criteria should be met to conclude a PIP has been successful:
- Measures of success were monitored over time.
- The goal was attained (process changes were made and sustained, no recurrent events).
- You are confident that the change is permanent.
RCA PIP Template
This template can be used to document the completed RCA PIP process, including follow-up actions and measures. Revise it as necessary to meet your needs.
Team Facilitator: Date RCA Started:_________________________________________________ Date Ended: ________________________________________________
Team Members:
| Name | Position | Name | Position |
|---|---|---|---|
Brief Narrative Description of Event (include time line if available):
Root Causes and Contributing Factors
Conduct your systematic analyses to determine your contributing factors and root causes. Use techniques such as the five whys, flowcharting, or the fishbone diagram to assist in identifying the root causes. Additional tools are available that guide the use of each of these techniques. It is helpful to keep any of these analyses with your PIP documentation for future reference. Describe each root cause as identified by the team. Enter these in the table below.
Corrective Action Plans
For each root cause identified, enter the corrective action plans intended to prevent the root cause from causing another harmful event. There can be more than one action plan for each root cause. Some action plans may be short-term interventions which can be accomplished quickly and some action plans require more long-term implementation steps. For each action plan designate the individual or group responsible for completing the action and the time frame for completion.
| Root Cause | Corrective Action | Responsible Individual/Group |
Completion Deadline |
|---|---|---|---|
Measures of Success
| Corrective Action | Measures of Success (How we will know if this action is successful) Consider measures of how often recommended processes are not followed and the incidence of similar adverse events. |
Reporting Schedule and Individual or Group Responsible for Reviewing Results |
|---|---|---|
Acknowledgement: This guide draws on information from the VHA National Patient Safety Improvement Handbook (March 2011), Error Reduction in Health Care: A Systems Approach to Improving Patient Safety, 2nd ed. (Jossey-Bass, 2011) and the Minnesota Adverse Health Events Measurement Guide (Minnesota Department of Health, 2010).
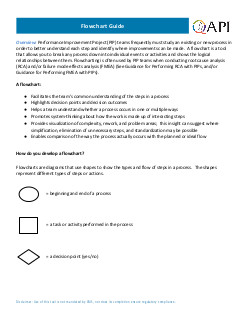
Flowchart Guide
Overview: Performance Improvement Project (PIP) teams frequently must study an existing or new process in order to better understand each step and identify where improvements can be made. A flowchart is a tool that allows you to break any process down into individual events or activities and shows the logical relationships between them. Flowcharting is often used by PIP teams when conducting root cause analysis (RCA) and/or failure mode effects analysis (FMEA) (See Guidance for Performing RCA with PIPs, and/or Guidance for Performing FMEA with PIPs).
A flowchart:
- Facilitates the team’s common understanding of the steps in a process
- Highlights decision points and decision outcomes
- Helps a team understand whether a process occurs in one or multiple ways
- Promotes system-thinking about how the work is made up of interacting steps
- Provides visualization of complexity, rework, and problem areas; this insight can suggest where simplification, elimination of unnecessary steps, and standardization may be possible
- Enables comparison of the way the process actually occurs with the planned or ideal flow
How do you develop a flowchart?
Flowcharts are diagrams that use shapes to show the types and flow of steps in a process. The shapes represent different types of steps or actions.

|
= beginning and end of a process |

|
= a task or activity performed in the process |

|
= a decision point (yes/no) |

|
= direction or flow of the process |
To draw the flow chart, brainstorm the steps in the process, and list them in the order they occur. Ask questions such as "What really happens next in the process?" and "Does a decision need to be made before the next step?"
Work through your whole process, showing actions and decisions in the order they occur, linking these together using arrows to show the flow of the process. Decisions are represented as diamonds and reflect a condition that impacts the process (e.g., if yes, then...; if no, then...). At each decision diamond, draw an arrow for each decision outcome. Typically there are two decision outcomes such as, yes/no or true/false. Continue charting the process as it would be performed as a result of the decision.
If you find that your process occurs in multiple ways; i.e., different people or units do things differently, you may want to flow chart the process in each of the different ways it occurs. This can help you to understand what, when, and why variation is occurring, and informs any process improvement changes you plan.
Finally, review your flowchart. Work through each step asking your team if you have correctly represented the sequence of actions and decisions involved in the process. And then (if you're looking to improve the process) look at the steps identified and think about whether work is duplicated, whether other steps should be involved, where gaps or breakdowns occur, where you can make improvements in your process.
Tips:
- When developing a flowchart, include people with personal knowledge of the process being discussed.
- Many teams find it easy to flowchart on large poster size sheets, using sticky notes for process steps, or on white boards. This allows you to move steps around and add steps as you define the process.